L&S
Learning
Support
Services
presents
TEACHING with TECHNOLOGY
ONLINE WORKSHOP SERIES | 2012-2013
Design Guide
Introduction
In last week's reading, "It is not television anymore: Designing digital video for learning and assessment", the authors provide a way to map learning outcomes directly to distinct video genres. The following design guide serves as a way to continue to the next steps of creating a designed multimedia object. We begin by taking pictures. Why pictures? The fundamentals of photography are the fundamentals of video. A single picture allows us to slow down the stream of many pictures per second that occurs in video and slow it down to its essence-a single image.
Process
The design-development process usually begins with a set of requirements. As preparation for watching the tutorial, assume that the learning outcome and multimedia genre have been selected. The artifact being photographed needs to be seen well enough to perform a live annotation of it's text and design during a front of the class presentation.
Review
Take note that the video moves through a sequence of actions that are informed by techniques, design principles and one law of the physical universe. Consider that the steps could be seen as purely technical. Then again, consider whether or not the starting design requirement, that of a clearly rendered image suitable for presentation, could be reached as well without the application of theories inherent within the media arts discipline.
Recall the sequence of tips:
- Assess the quantity of light
- Isolate or contextualize the image
- Use available resources (i.e. make use of what you have as opposed to wishing for what you don't have)
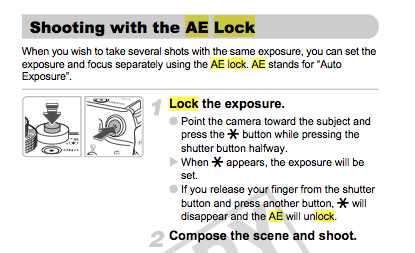
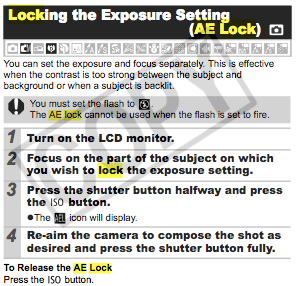
- Optimize exposure with AE lock if needed
- Don't rely on exclusively the first shot composition
- Understand light, intensity, and distance vis a vis the inverse square law
- Shape and modify light to refine image
Camera Notes
Chances are you'll be using a point-and-shoot camera or the camera on your phone to complete the following project. Naturally, it's impossible to account for every type of camera, but the techniques covered here will apply to almost all situations with a few slight variations.
Canon cameras use a function button along with the shutter. For example, Canon cameras found on campus all share the same procedures, but have slightly different function buttons. The best advice is to check the manual before starting the assignment.
Canon G11
UW-Madison Location: Digital Media Center

Canon SD1000
UW-Madison Location: College Library

Project #1: A Single Image
 Practice and Apply
Introduction
Your first project will be a photography assignment. You must identify a relevant person, place, or thing and then photograph it. You should have an idea of how you can integrate the final picture into your work. You should strive to create an effective instructional object, AND to elevate your creative skill.
Use the the production guide included in this module as a starting point. You should feel free to use outside resources as much or a little as you desire.
The final product will be an image submitted to this week's discussion forum. Be prepared to include a short text that describes the experience, including challenges and lessons learned.
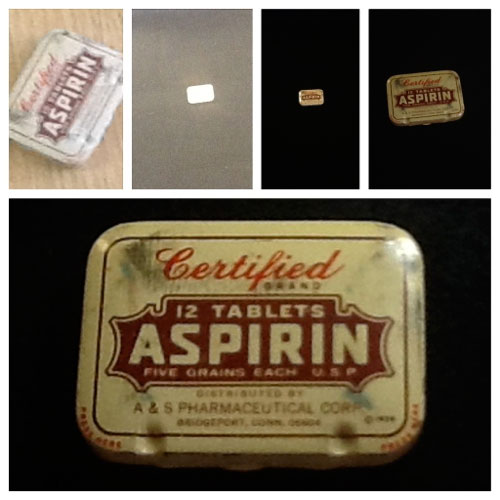
The picture may be any subject or style, but it should be a new image. You may, however, take a picture of a picture, in the context of photographing archival material or artwork. If you desire you may submit a group of pictures to show how your shots changed over time, but limit the number of images to 5.
If you can't think of something and want more guidance, here are a few ideas sorted by discipline:
Language
Photograph target language currency as the first in a set for use in a language lesson about money. Accompany the photo with text that conveys cultural or historical relevance. It's also an opportunity to include personal narrative. For example, "I found this coin on a dusty road on the way to..."
Legal Studies
Photograph a symbol for a book chapter or PowerPoint presentation. Architecture and architectural motifs contain signs and symbols that can be helpful when trying to communicate abstract concepts, like justice. A trip to the capital square may yield several interesting pictures.
Cross-discipline/Professional
Use this project as a way to develop a bio-pic/profile picture to use for conference proposals, course page profiles, or social networking sites like LinkedIn, Google+, etc. Work in a self-portrait context or work with a partner in a traditional portraiture context.

Step 1: Select
Select a work of art, artifact, or object, person, place, or thing that you want to photograph. Choose something that supports your work in a real way. Challenge yourself to improve, wherever your starting point happens to be.
Step 1.1: Commit
Levels of participation
- Low time-commitment: Watch the video and participate in discussion
- Medium time-commitment: Follow the production guide point-for-point
- High time-commitment: Go rogue
Tip: Most photo assignments present hidden requirements and potential pitfalls depending on a combination of industry conventions, techical requirements and delivery platform. The most flexible way to navigate the maze is to simply acquire the best quality image you can manage from the very start. The most direct approach is to find out the specifications for final dimensions, the delivery platform (web, print, video), and required file type.
Hence: be prepared to submit a image with a max width of 500 pixels at 72 ppi in RGB color at maximum quality (If you are not familiar with this terminology, ignore it for now).
Step 2: Watch
Watch the Design Guide Video and consider the object you have in mind for your assignment. Think about how it is similar to or different than the small container used in the video. If it's dramatically different (like in size for instance) you'll need to pick and choose the tips that make the most sense to try out.
Step 2.1: Review the Tips
- Assess quantity of light
- Assess available materials
- Isolate or contextualize
- Alter from first perspective
- Use exposure lock if needed
- Use inverse square law to hone light
Step 3: Checklist
Complete a written or mental checklist of essential pre-production concerns.
- Identify camera. Reserve beforehand if needed
- Check batteries.
- Check camera storage (e.g. SD card)
- Review the basic camera functions
- Consider date, time, and place logistics
- ID additional equipment like lights, background, light modifiers
- Note if any special permissions are needed
Step 4: Take Pictures
Take some pictures! Try some of the techniques outlined in Movie 1.1 plus any and all other ideas to capture an image that you would use professionally. Keep a log of the techniques you used to capture each image. Use simple language to describe the process and the result of each image.
Tip: Prepare for the unexpected. Notice opportunities that occur in the every day that can often exceed the potential of what you have pre-planned.
Tip: Prepare a mobile photography kit.
Tip: Put yourself in the shoes of your students. Walk through a photo assignment for the purpose of uncovering elements that need further explanation.
Step 5: Narrow
Narrow your photographs to a single image. You may simply select by reviewing 'in camera' or you may want to import your pictures into a computer for review and editing. If you desire you may submit a 'diptic' or a group of pictures contained within a single frame, but please submit only one frame to the discussion.
Step 5.1: Edit
There are several photo editing options widely available that are either bundled with the computer like iPhoto, or photo editing programs like Google's Picasa. If you've never worked with photo editing, the bigger challenge is choosing the right tool for your own tastes and sensibilities. There are also excellent basic editing functions included in most new smart phones, so follow the path of least resistance if you plan on using your phone as your camera and use the included editing functions. Lynda.com is a comprehensive online training library that's supported at no cost to UW-Madison faculty, staff, and students. If you need software training in order to edit your image, take advantage of Lynda.com.
Free/bundled software
- Mac-iPhoto
- iOS-Photo
- Windows 7-Photo Editor
- Android-Gallery app
- Mac/Windows-Picasa
Paid software
- Mac/Windows - Photoshop
- iOS - Snapseed
- Android - Photoshop Touch
Step 6: Submit
Submit your image to the Project 1 discussion forum as either a direct upload or as a link from a web service of your choosing. Follow the guidelines below if you are unsure of which method to choose.
Step 6.1 Sharing Images
When you compose a message in a discussion forum, the area where you enter text has a cluster of small icons that represent different editing features. One of the icons looks like a green landscape. This is the symbol for 'insert picture' within the typical iconography of web-editing tools.
In order to place your image in the discussion composition, it's easiest to first type the title of the photo, then hit return on your keyboard, then press the little 'insert picture' icon. A pop-up window appears and shows a button that asks you to choose the image from a location on your computer. Navigate to the image and click on the file name to select it. Hit ok.
Once the image is selected, it will appear on the web page, but it's likely not exactly the right size and might be excessively large, depending on the picture's dimensions. Resize the picture by click+hold+drag one of the corner 'handles' until it is the right size for the page. If you took note of the final size requirements, the image will fit nicely upon initial placement.
Click 'post' to finish.
Other methods for sharing images:
The other option when composing a discussion post and then inserting an image is to link to a URL of a photo that is hosted at a different location on the Internet. Some of the options in order of privacy (from most to least private) are:
- My WebSpace
- Box.com or Dropbox.com. Note: People with valid UW-Madison NetIDs are now able to create a free 50GB Box account
- Picasa
- Flickr
Using one of these services, you should be able to copy the link of a photo and paste the full URL into the discussion post.
Step 7: Describe
Write a short description to accompany your final picture. Write about the process of 'doing' and share any challenges, successes, or anecdotes that you'd like to share.